A framework to serve ComfyUI API on Runpod
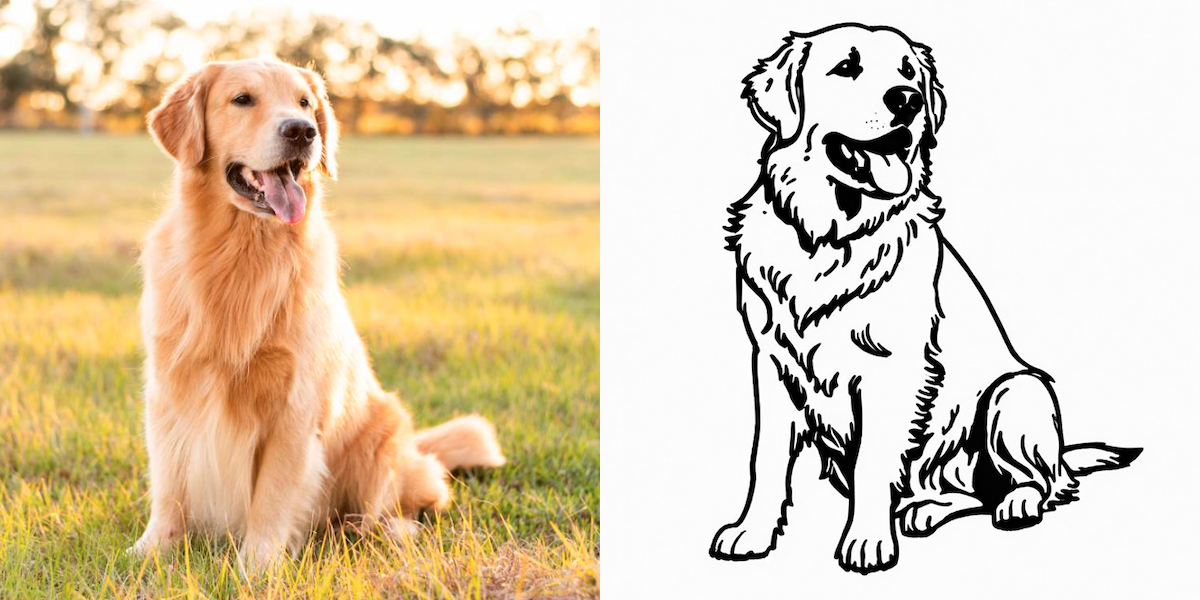
If you are into AI art then you must have heard of ComfyUI. Its a great interface to create unique artworks and styles. With comfy you can turn this sweet golden retriever into a line art version for printing or engraving, and you can do so much more with it.
I recently worked on a project to generate images that can be printed or engraved. I designed a workflow that generated the expected style of images and ran the workflow on cloud GPUs as an API endpoint.
Having done several similar projects and having pulled my hair multiple times running into several issue, I thought it would help to create a simple framework / guide for serving any ComfyUI workflow as an API. I want to help anybody reading this understand the overall setup and not commit the same mistakes that I did.
Designing the ComfyUI workflow
We wanted to take user images and turn them into line art style images which can be used for printing or engraving. ComfyUI lets you use txt2img, img2img, controlnet, ipadapters, custom nodes etc in your workflow. What you use really depends on what your needs are.
For this we needed an img2img process that would take the input image, understand its subject's positions as well as a semantic description of the image. We can then influence the diffusion process with this.
This img2img workflow is specifically for generating line art style images for printing and engraving. For this we needed:
- Base models and Loras - a line art finetuned base model and lora
- Controlnets - to control the model and make images similar to the user uploaded image. (Canny is a great choice.)
- IpAdapters - We want line art style images which are perfect for printing and engraving
- Custom nodes - For Image Captioning with GPT 4o. Captions help a lot with img2img.
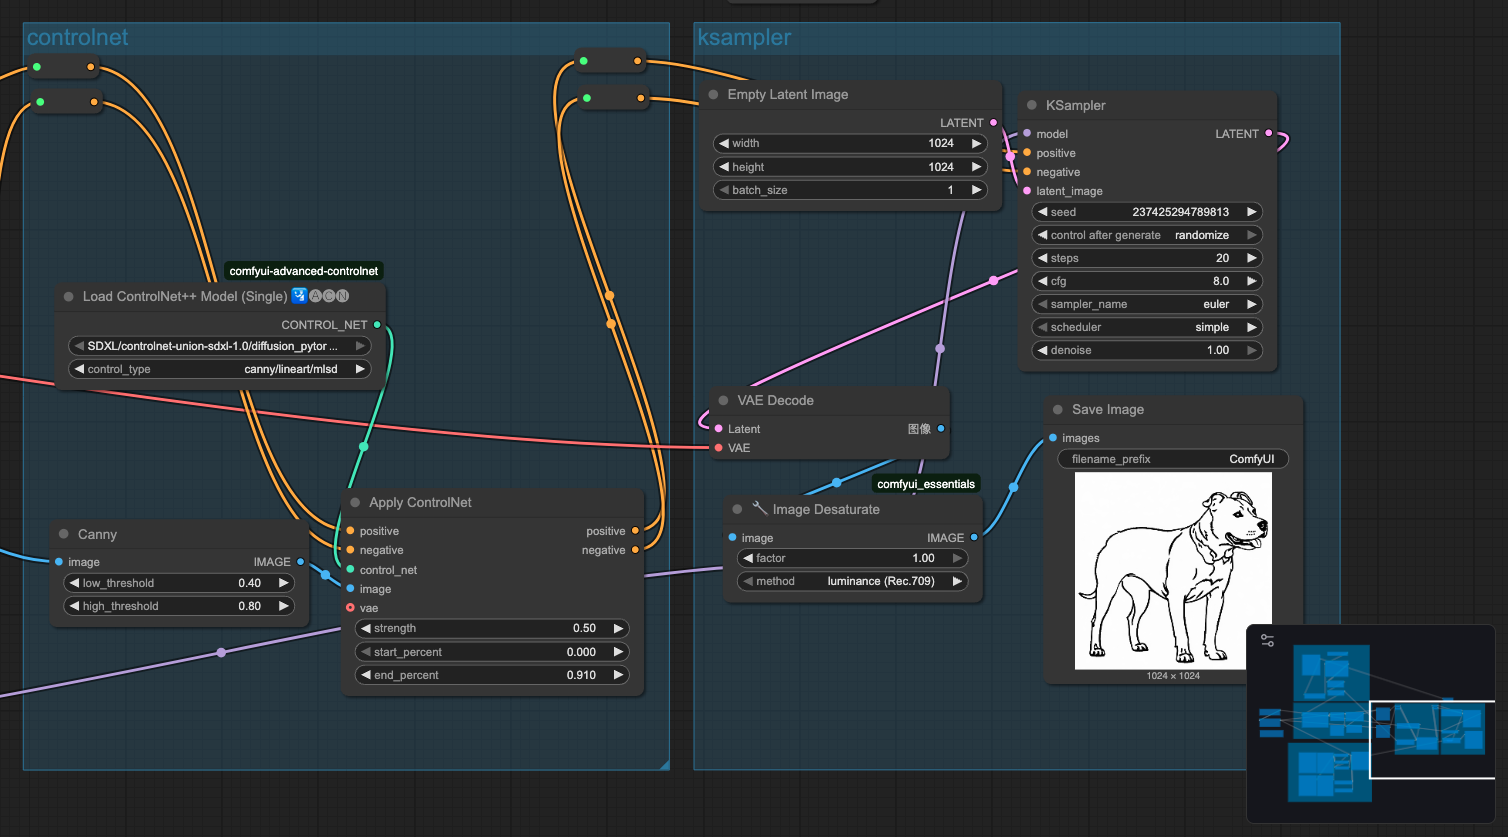
I like to create blocks in my workflow. The model block loads the model, the controlnet block creates the canny image etc. This separates our concerns and is more natural for experimenting with one block while keeping every other block's settings the same.
The models available on Civitai are pretty good. You can search around for better models or train your own models for more flexibility.
Here are some I used:
https://civitai.com/models/43977/leosams-helloworld-xl https://civitai.com/models/136348/coloringbookredmond-coloring-book-lora-for-sd-xl https://civitai.com/models/209889/coloringbookredmond-21v-coloring-book-lora-for-freedomredmond-sd-21
Once you have your workflow in place its really helps to try different settings in a partial derivative manner. Sort of like changing the setting of each block while keeping others the same to reach a setting where things are just right. This is sometime difficult and takes time. Moreover we are dealing with images so getting the settings right is a more of an art than an exact science. Its an amorphous feeling but backed by how each block affects the image.
Serving our workflow as an API with Runpod
Great! We are generating images in the correct style. Also it takes us around 10 secs to generate the image. Now we want make an API out of it.

The users will be interacting with the app which will use our ComfyUI API to generate images. We will be serving our Comfy workflow using Runpod. You can choose other services like Replicate, Fal etc. Each have merits of their own. Replicate is great too. I hope to write about ComfyUI - Replicate setup too if I get some free time.
After tinkering and experimenting our workflow works and our settings are fixed. Now we want to create a clean, lightweight setup for going into production.
This production workflow will run on a Runpod serverless worker. For this we setup a fastapi server to interact with comfy and dockerise this setup to run on the serverless workers. There are many repos available that are especially good for serving comfy API. I like to keep it simple so I wrote my own.
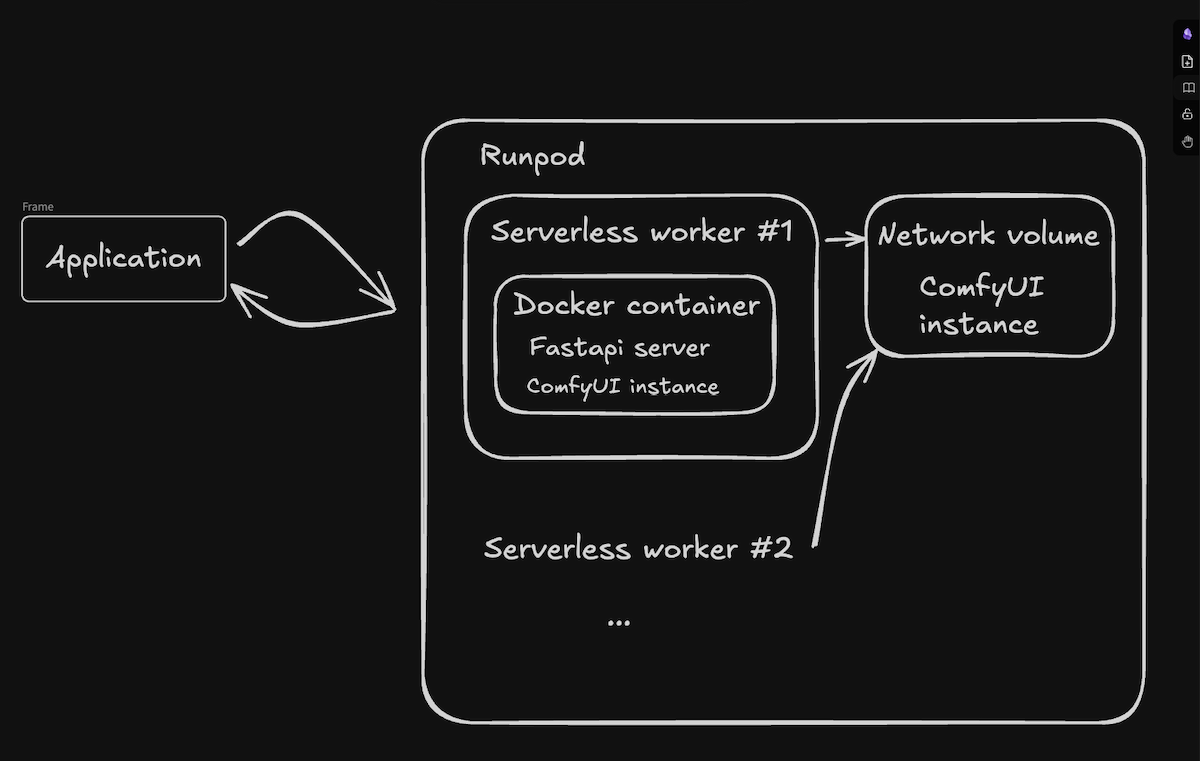
Here we have the application interacting with Runpod Serverless service. I have created serverless workers that use the network volume with the comfy instance to run the workflow and generate the images. We have large models so I preferred to use the network volume. It also helps to decrease the cold start times as we don't have to download the models. Baking the model into the docker image is also a good approach but I wanted to minimize the initial setup time so I went with a network volume
I ran into a lot issues going through this step so here are few things to remember:
- Create a testing environment for the API. I used postman for it. It really helps to have it setup with different parameters, scripts and images for faster and easier testing
- Tight Test->Fix->Update Loop. The serverless code wont be perfect the first time. You have to update the server code and create multiple docker images. I prefer doing this on cloud vscode services like lightning.ai. It saves time downloading and uploading the docker images and its nice to have a separate vs code instance running on the cloud accessible from anywhere.
- Versioning: It really helps to version your docker builds and keep the loop tighter to save time. As usual, descriptive git commits help a lot.
Once our containers are running on the serverless workers. Now we can decide how we want to scale it. That depends on your production load. I like to keep my few active works with a 30s queue delay depending on the generation times.
Conclusion
That's it! Our workers are running and we are serving a custom comfy workflow on runpod. I have found that this framework is quite useful for creating and deploying any kind of ComfyUI workflow. I hope that it helps you.
More about who writes this site and how to reach me is on the about page.
Build what you want